Monday, August 14, 2017

Crochet Flower and Fabric Scrap for a Gift Bag

I'm a crochet diva and sometimes even I forget that a  crocheted flower  makes a perfect bow! And wait...a scrap of fabric can simply be gathered up into a pouch and used - instead of a gift bag!


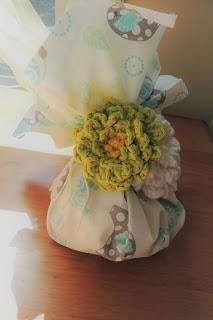
Put a flower on a pouch of fabric: instant gift bag!

This is my Outside-In Zinnia pictured above, part of "Susan's Showy Flowers" crochet pattern collection.


Now don't get me wrong, I love gift bags because they are reusable. I think there might be some in our house which are as old as my youngest child and as wrinkled as her mom! They are fun, they are bright, they're nice and sturdy and HECK, they're so easy! Drop the awkward gift shape in them and you're done!


But if you happen to be a wanna-be hippie like me and would like to begin using up bits of yarn and fabric rather than run to the store, just cut out a piece of fabric large enough to enfold your gift, make a flower in 10 or 20 minutes (one of my newest flower pattern sets is linked below), and tie the flower onto the "neck" of your pouch with a piece of string.


Here is the pattern for the Zinnia crochet flower above. (It's an excerpt from the crochet pattern book I mention at the bottom of the post)


Susan's "From-the-Outside-In" One Piece Zinnia

C:\Users\Susan\AppData\Local\Microsoft\Windows\INetCache\Content.Word\DSCN1199.jpg


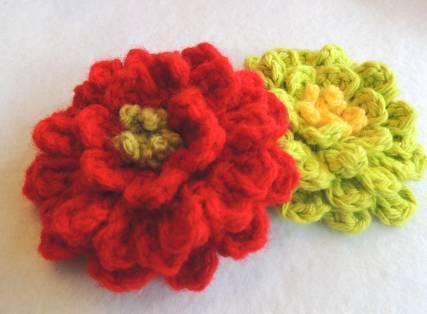
The examples above are worked in a medium weight yarn for the main color, a lightweight yarn for the last few stitches of the flower center. Use a size G hook – for the medium weight yarn - and D hook – for the lightweight yarn.


flowerdividerNoBackgrsm.JPG


The nice thing about this zinnia (it ends up about 3" wide when worked in medium weight yarn) is that it's worked all in one piece, except for the center stamens if you decide to change color for them. It's super dense, the petals are beautiful and crowded, and it will stand up well to tough use on a child's hat or a basket or purse.

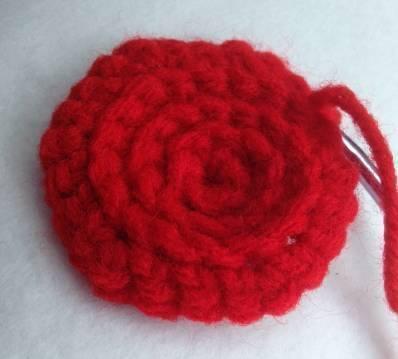
First, create a flat sc circle for your flower base: work in Front Loops Only!

Rnd 1 of base: Ch 2, work 6 sc in 2nd ch from hook. Continue working in the round in the same direction, no joining:


Rnd 2 of base: work 2 sc in FLO of every sc around, do not join: 12 sc circle


Rnd 3 of base: in FLO work (sc, 2 sc) around, do not join: 18 sc circle


Rnd 4 of base: in FLO work (sc, sc, 2 sc) around. (See photos below) Sl st in next st, and flip to reverse side of work

C:\Users\Susan\Pictures\CrochetPhotos\NewFlowers\IMG_4329.JPG

After Rnd 4


C:\Users\Susan\Pictures\CrochetPhotos\NewFlowers\IMG_4331.JPG

Flip to reverse side of work and notice the spiral of left-over loops into which you will work your next stitches.


First outer petal round is a round of tc petals in every other stitch: Ch 3, tc in 1st (outermost) sc of circle, ch 3, sl st in same sc, *skip next sc, sl st in next sc, (ch 3, tc, ch 3, sl st in same sc), repeat from * around the outermost sc's of the circle. (See photo below).


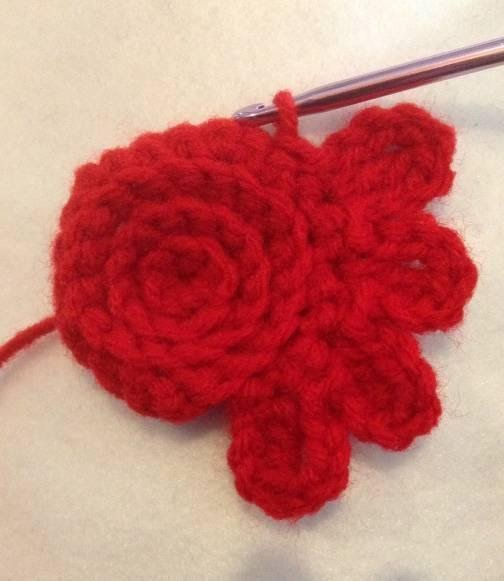
At the end of the round, you should have 12 petals. Do not turn (do not flip), or join,

but continue on in the same direction:


As you reach the point where the sc's spiral inward, insert your hook in the remaining back loop of the next sc of the base circle (see photo on next page)

C:\Users\Susan\Pictures\CrochetPhotos\NewFlowers\IMG_4340.JPG


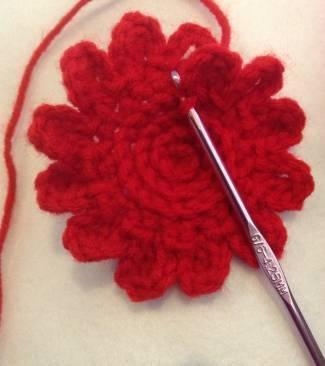
Now you have finished the outer petals and will start spiraling inward, continuing to work in the round.

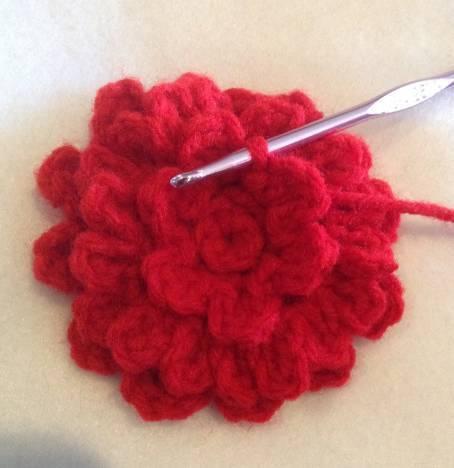
Work a round of dc petals in every loop: sl st, ch 2, dc in same loop, ch 2, sl st in same loop, *sl st in next loop, (ch 2, dc, ch 2, sl st in same loop), repeat from * for eighteen somewhat crowded dc petals. (This is one round around the center).

Next, a round of dc petals in every other loop: *skip next loop, sl st in next loop, (ch 2, dc, ch 2, sl st in same loop), repeat from * for six petals (one round). This should leave you 6 loops, close to the center.


In these rounds it is helpful to fold down the base disc so you can more easily work in these loops from the first rnd of the flower.

C:\Users\Susan\Pictures\CrochetPhotos\NewFlowers\IMG_4343.JPG


You will stop when you reach the last 6 loops of the inward spiral, change color to a lightweight white or pale green or yellow, (dmc embroidery floss is great for flower centers: I have used # 165). Also switch to a smaller D hook) and work as follows:


C:\Users\Susan\Pictures\CrochetPhotos\NewFlowers\IMG_4344.JPG


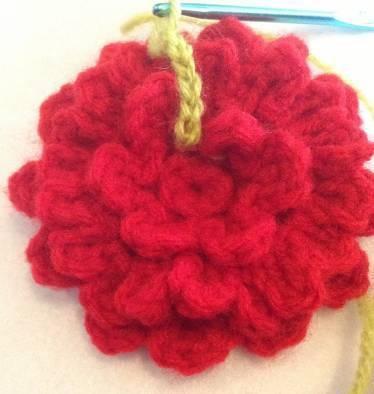
*(sl st, ch 7, sl st) in next loop, repeat from * 5 times, tie off.


C:\Users\Susan\Pictures\CrochetPhotos\NewFlowers\IMG_4346.JPG


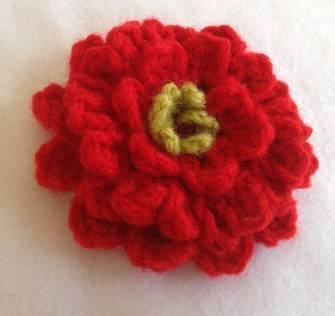
Pull all,yarn or thread ends through to back of flower and weave through work.


C:\Users\Susan\Pictures\CrochetPhotos\NewFlowers\IMG_4353.JPG


flowerdividerNoBackgrsm.JPG


 If you're interested, my Amazon Kindle eBook "Susan's Shower Flowers"  of my best crochet flower patterns - including this one -  is live now and also Susan's Showy Flowers is on Etsy as an eBook in pdf form. ALSO, I'm so excited that it's available now as a 117-page 8"x10" full color paperback on Amazon as well. By the way, thank you for considering support of my design work by buying this crochet pattern book.😍


You can see all of my crochet eBook patterns here:

www.susanlinnstudio.etsy.com


https://www.amazon.com/Susan-Kennedy/e/B00O07W7MS/ref=ntt_dp_epwbk_0


Thanks for looking and happy crocheting!


Susan


Friday, January 6, 2017

Free Baby Hat Crochet Pattern excerpted from Susan's Flowers Bees Butterflies and More!

Hey you guys, I thought I'd post the free little single crochet baby hat pattern that I have as a little add-on on this Spring Flowers, Bees, Butterflies and More Crochet Pattern ebook.
Susan's pattern set includes step-by-step photos and detailed instructions for darling flowers, buzzy bees and this single crochet baby hat
my sassy flowers, bees and butterflies perch nicely on this darling sc baby hat

I'd love for you to check out the entire pattern set on shopify, amazon, or etsy, but in the meantime get started on that little baby's fuzzy little hat!


Abbreviations and Terms used in this Pattern: 


 Beg   beginning (as in, “sc in beg chain” – single crochet in the chain at the beginning of this portion).
Ch   chain
Dc   double crochet
Lsc  long single crochet, in which the hook is inserted below the normal space, to a previous round, resulting in a very long post which covers previous single crochets or double crochets (depending on the situation). 
Picot   small decorative bump made by making a chain, then going back to a loop a few chains back (the pattern determines how many), inserting your hook, yarning over and pulling through a sl st to join and form the bump
Prev    previous
Rnd    round  
Sep     separated
Sl st    slip stitch (running your thread through some work to get to a new place without changing the shape of the work; or, attaching to a stitch with just a loop pulled through) Sp    space formed in your work, usually on a previous round
St    stitch

 Instructions for Hat

Newborn (for an approximate head circumference of 12” when worked in baby or lightweight yarn) 
Begin with a ring made of ch-2 (in other words, ch 2, join to 2nd ch from hook to form a small ring);  rnd 1 is 6 sc in that ring;  rnd 2 is 2 sc in every sc(an increase in every stitch);  rnd 3 is working a sc in every sc, with 2 sc (an inc) in every other sc;  rnd 4 is working a sc in every sc, inc in every third sc;  rnd 5 is sc in every sc, inc in every 4th sc;  rnd 6 is sc in every sc, inc in every 5th sc;  rnd 7 - 16 is sc in every sc;  rnd 17 is again 1 stitch in every stitch, --but make every other stitch a long single crochet, which will make a long decorative post. In other words, *(sc, lsc) around. rnd 18 is sc in every sc, with a decr at the beg of the rnd. rnd 19 is a repeat of rnd 17, *(sc, lsc) around.  rnd 20-24 is sc in every sc, with a decr at the beg of each rnd.  

Then work a decorative brim which looks a bit frilly, if you wish:

Rnd 25: ch 2, dc in every dc around, join.

Rnd 26: *(ch 3, sc in next dc)around, join. Tie off and weave ends through work.


Tie off and weave ends through work.


3 Month: (for an approximate head circumference of 14” when worked in baby or

lightweight yarn) Use 4 colors, three solids and a variegated, if desired. 

Begin with a ring made of ch-2 (in other words, ch 2, join to 2nd ch from hook to form a small ring);

 rnd 1 is 6 sc in that ring; 

rnd 2 is 2 sc in every sc(an increase in every stitch); 

rnd 3 is working a sc in every sc, with 2 sc (an inc) in every other sc;  rnd 4 is working a sc in every sc, inc in every third sc;  rnd 5 is sc in every sc, inc in every 4th sc;  rnd 6 is sc in every sc, inc in every 5th sc;  rnd 7 is sc in every sc, inc in every 6th sc;

rnd 8 is sc in every sc, inc in every 7th sc; rnd 9 - 21 is sc in every sc; rnd 22 is again 1 stitch in every stitch, --but make every other stitch a long single crochet, which will make a long decorative post. In other words, *(sc, lsc) around.

rnd 23 is sc in every sc, with a decr at the beg of the rnd; rnd 24 is a repeat of rnd 17, *(sc, lsc) around. rnd 25-28 is sc in every sc, with a decr at the beg of each rnd.  

Then work a decorative brim which looks a bit frilly, if you wish:

Rnd 29: ch 2, dc in every dc around, join.

Rnd 30: *(ch 3, sc in next dc)around, join. Tie off and weave ends through work.


Tie off and weave ends through work.


6 Month: (for an approximate head circumference of 16” when worked in baby or

lightweight yarn) Use 4 colors, three solids and a variegated, if desired. 

Begin with a ring made of ch-2(in other words, ch 2, join to 2nd ch from hook to form a small ring);  rnd 1 is 6 sc in that ring;  rnd 2 is 2 sc in every sc(an increase in every stitch);  rnd 3 is working a sc in every sc, with 2 sc (an inc) in every other sc;  rnd 4 is working a sc in every sc, inc in every third sc;  rnd 5 is sc in every sc, inc in every 4th sc;  rnd 6 is sc in every sc, inc in every 5th sc;  rnd 7 is sc in every sc, inc in every 6th sc; rnd 8 is sc in every sc, inc in every 7th sc; rnd 9 - 11 is sc in every sc, inc in every 7th sc;  rnd 12-26 is sc in every sc; rnd 27  is again 1 stitch in every stitch, --but make every other stitch a long single crochet, which will make a long decorative post. In other words, *(sc, lsc) around.

rnd 28 is sc in every sc; rnd 29 is a repeat of rnd 17, *(sc, lsc) around.

rnd 30--34 is sc in every sc, with a decr at the beg of each rnd.  

Then work a decorative brim which looks a bit frilly, if you wish:

Rnd 35: ch 2, dc in every dc around, join.

Rnd 36: *(ch 3, sc in next dc)around, join. Tie off and weave ends through work.


Tie off and weave ends through work. 
Thanks for checking out my blog!! Please go to my etsy store, my shopify store, or my amazon listings to see what else I've got to keep you busy with easy little crochet projects!